Subscribe

RSS Feed (xml)

Powered By

Skin Design:
Free Blogger Skins

Powered by Blogger

Showing posts with label rooms. Show all posts

Saturday, February 6, 2010

Children's Artwork

My children produce a TON of artwork daily. I love it all, I really do, but if I don't get rid of some of it, it will take over the house! I've tried having my children help choose which works of art to save and which to "pass along for someone else to enjoy", but that just brought hurt feelings.

What works for me is to stack up all of the artwork in a location that's out of sight with the hopes of out of sight, out of mind. This may sound very un-mommyish, but after a week or so, if I haven't been asked for any of those pieces of art, they go out in the trash. I felt like the world's worst mom the first time I threw away some of my kids' creations. Now, it still isn't fun, but I know that I can't possibly keep it all. I am very careful to date and save any handprints or footprints my children do, though. Those go straight to the kids' memory bins. I also tend to hang onto drawings of the family or self-drawings.

One idea I've heard from other moms involves scanning artwork into the computer to use as a screen saver or to save on disk. I may have to try that sometime.

How do you manage your children's artwork?

Sunday, January 31, 2010

Toys, Toys, and More Toys!

Oh my gosh do my kids have tons of toys! Granted, it does look a bit worse because most of our kids' toys are in one room in the basement, but holy cow! It's actually rather embarrassing. When you have three children of different ages and both boys and a girl, it's hard to get rid of toys.

I hit my, "We need to get rid of some of these toys!" point the other day. I tend to develop attachments to things until I start to get stressed out because of the clutter. At that point, everything is fair game! When I told the kids we needed to start cleaning up and they were complaining that there was too much, I knew some of these much-loved toys needed to go. I have a really hard time throwing away perfectly good items. I hate to feel wasteful, so I'll always garage sale, donate to Goodwill, or Freecycle something that I think still has a lot of life in it.

I did throw away all of those little kids' meal toys that just clutter up the place. Then, I pulled out some of the lesser used toys. We have so many kids' items, that I think we'll actually have a garage sale this year. To make preparing for a garage sale easier, I wrote prices for each toy on a sheet of paper that I tucked in the bag with the toys. Now, when garage sale time rolls around, we just have to write the price on some tape and stick it to the toy. (Okay, so in reality, my husband will be doing that because if I do it, I'll start to second-guess myself.)

You know, I just had a realization. Part of the reason I feel bad about getting rid of the kids' toys is that someone spent time and hard earned money to purchase each toy for the kids. Here's my "aha!" idea... I think I'll have my dear hubby keep track of how much money is earned from selling the toys. Once it's all done, we can split that amount of money into three, and deposit it into each of our kids' savings accounts. It's the best of both worlds. We don't have toys laying around that aren't being used, and the kids have extra savings because of those toys.

Now there are still a ton of toys in the kids' play area, but there's plenty of time until our garage sale to weed out a few more toys. Just don't tell my kids!

Wednesday, January 27, 2010

Organizing, Finances, Kids, & Changes, Oh My!

When I started this blog, I did it to encourage myself to get my house and life in order. I love to organize, so I thought this would be fun. Well, while I've been enjoying writing and feeling like I have a daily "job", I'm just not really happy with the direction in which I have started taking this blog. I'm no professional organizer, just a wanna-be, so I really want to back away from the path I was starting to go down - a bossy one! =)

In addition to enjoying organizing, I really enjoy saving money and seeing how far I can stretch a buck. My husband and I currently don't carry any debt other than our mortgage. (We've both been very lucky and very strategic with our money.) At a couple of points, though, we've leaned on our main credit cards. This may sound silly, but I really got a kick out of figuring out how we'd go about paying off the credit card and how quickly we could do it. Now, we were never in debt by much, but I enjoyed the challenge that debt offered.

One other topic I like to talk about and makes me happy is my family. I love to share stories about my kids in addition to hearing stories about others' kids. Our two very different dogs provide a bit of humor from time to time as well.

I guess what I'm saying is that I may take this blog in a whole other direction than I had initially planned. I think I might try to figure out how to mix these three interests of mine. I know, good luck, huh? Unfortunately, this blog itself likely won't be very "well organized" for a while. Hopefully it'll be more enjoyable to read with changing things up and me writing more in the same style that I talk.

What do you think? Anyone out there? =)

Wednesday, January 20, 2010

Utensils and More

How are you feeling after going through your dishes and cups? Are you ready to tackle another part of the kitchen? I'm thinking that since it's the middle of the week, maybe we should do an easier task today. Sound good? It does to me! Today let's organize our utensil drawers!

As with all of the other kitchen areas we've organized, let's start by pulling everything out of the utensil drawer and giving the drawer a quick wipe-down. What all is in your utensil drawer? We fortunately only have our utensils and coupons in our drawer. I put some of our coupons there because to get to our regular coupon drawer, I have to go through a baby gate. It's just easier to put them in the utensil drawer. I guess it's time to start putting them where they belong!

I'm a huge fan of utensil organizers. My only problem is that we recently received new utensils that are too long for our organizer. I haven't been able to find a new one that's the right size. I'm thinking I may have to do some work in my dear hubby's "man cave". Hehehe. Just don't tell him!

Organizing this drawer is pretty much self-explanatory. Sometimes we all could use reminders to straighten it up from time to time, though.

Task for today: organize your utensil drawer

Monday, January 18, 2010

Cups, plates, and bowls, oh my!

My husband and I have quite the collection of cups, plates, and bowls in our kitchen. We started out with a normal amount of plates and bowls - well, about 12-16 place settings that we inherited from my grandparents when we got married. As for cups, we started out with those my husband already had and a few of my own. Over the years, kids' place-settings have been added to our collection in addition to many (and I do mean many) mugs and other types of cups. Sometimes I feel as though the cups are multiplying in our cabinets at night. Do you have the same problem?

Here are the steps I'm taking to get these dishes under control:

Step 1: Pull those cups, plates and bowls out of the cabinets.

Step 2: While everything is out, I may as well do a quick swipe of the shelves to clean them up a bit.

Step 3: Make three piles - keep, give away / garage sale, and throw away. We often end up with tons of plastic kid's cups from restaurants and mugs from various places. Plastic cups can often be used for other purposes such as scoops for pet food, cat litter, or potting soil. They can also hold screws and nails in the garage. Any plastic cups that we don't currently have a use for will be recycled (if it's recyclable), saved for garage sales, or thrown away. Those extra mugs we have laying around will be either sold at a garage sale or taken to a thrift shop. Since we still have young kiddos in our house, we'll have to find room for their plastic plates and bowls for now.

Step 4: Now that we've gotten rid of all of those extra cups and/or dishes, there will hopefully be plenty of room for what we have decided to keep. Look at everything you have and, like with the refrigerator and freezer, try to picture where you would like everything. If you plan it out, you hopefully won't have to pull everything back out to rearrange it so it will all fit. Which shelf will be for each item type? Keep in mind who will be needing to reach the dishes.

Step 5: Time to get all of those dishes put back away and enjoy your work!

Today's task: de-clutter and organize those cups and dishes, make a commitment to maintain those cabinets

Friday, January 15, 2010

Tackling that freezer

On Wednesday, we tackled our refrigerators. How is yours looking? It's a bit of a struggle to maintain it, but they say anything done for two weeks can become a habit. I'm hoping for that!

Today it is the freezer's turn to get a makeover. We're going to follow the same steps as we did with the refrigerator. If you have a chest freezer, being organized is even more important so food doesn't get left at the bottom forever, as it would if we had a chest freezer.

Step 1: How many shelves do you have to work with? Because we have a side by side unit, we have three main shelves and two drawers/baskets. In the door, we have three small shelves. The freezer can be a bit more of a challenge than the refrigerator because depending on your type of freezer, you may have a lot less shelf space.

Step 2: Who uses your freezer? We have four people who go into our freezer throughout the day - two adults and two children ages 5 and 3. This means I'll have to leave space down low for my kids to be able to reach the items they need, just as I did with our refrigerator.

Step 3: What are the categories of items you keep in your freezer? For us, I'll use meat, veggies, ice cream/desserts/popsicles, and frozen meals.

Step 4: Pull everything out of the freezer. If you feel moved to wipe down the freezer shelves while you're at it, go for it. Just move quickly!

Step 5: Group the items into their categories and decide which shelf/shelves make(s) the most sense for each group.

Step 6: Finally, re-pack that freezer. You may need to get creative if you have a freezer with one shelf, like we used to. You can group like items by placing them in open bins/plastic storage containers in the freezer. Small containers will often stack well, even without lids, and can be easily marked!

Task for this week: challenge your family to see how long you can maintain the organization in your freezer

Wednesday, January 13, 2010

Getting that refrigerator in order

Ugh, our refrigerator is a mess! I really don't care to organize it because it's just going to get messy again, but I know I should... Okay, here goes nothing!

The refrigerator is a great example of how being organized can save you money. If you have food items shoved in the refrigerator, like we currently do, chances are you'll forget what all is even in there. If you forget about it, it will eventually go bad and have to be thrown away. Thrown away food = thrown away money. I hate that! Before we moved, I had a shelf location for each type of refrigerated food. When we moved to our current house, though, we ended up with a different style of refrigerator. I now get to start from scratch, which can be a good thing. At least that's what I'm going to keep telling myself!

Step 1: How many shelves do you have to work with? We have four main shelves and three main drawers (two larger, one smaller). In the door, we have four shelves, two soda can holders, and one shelf with a "door".

Step 2: Who uses your refrigerator? We have four people who go into our refrigerator throughout the day - two adults and two children ages 5 and 3. This means I'll have to leave space down low for my kids to be able to reach the items they need.

Step 3: What are the categories of items you keep in your refrigerator? For us, I'll use meat, veggies, fruits, cheeses, dairy, beverages, condiments, and leftovers. Yep, I said leftovers. I found at our old house, that if I had one particular place for our leftovers, we were less likely to forget about them. Remembering about and using leftovers that were previously thrown away is like putting money back in our pockets. Gotta love that!!!

Step 4: Pull everything out of the refrigerator. What the heck, while everything is out of the fridge, why not wipe down the shelves, too.

Step 5: Group the items into their categories and decide which shelf/shelves make(s) the most sense for each group.

Step 6: Finally, re-pack that refrigerator.

Task for this week: challenge your family to see how long you can maintain the organization in your fridge

Monday, January 11, 2010

Tackling that dreaded junk drawer

I have a confession... Although I love to organize, I have one location in our house that will likely never stay organized, and I'm okay with that. Actually, I'm more than okay with that. I have this need to have a junk drawer in our kitchen where we can throw small odds and ends that may not really have a good "home".

While I'm okay with our junk drawer not always being organized - it is, after all, a junk drawer - I do still feel the need from time to time to de-clutter and organize it. Here's what our junk drawer currently looks like:


Does it look familiar to you? Most of what you can find in our junk drawer probably belongs in our home office, but we don't really have the place for it there, either. Besides, I like having ready access to pens, paper, batteries, rubber bands, etc. Let's get those junk drawers under control!

Step 1: Pull everything out of the junk drawer. This is the only way to see what all is hiding in it.

Step 2: Throw away anything that is obvious garbage.

Step 3: Set aside items that belong elsewhere. Once you have all of these items sorted out, put them away before moving on. I've found that it's frustrating to seemingly get to the end of a task just to discover you still have more to put away. Ugh, I hate that!

Step 4: Wipe out the drawer. Why not? It'll take two seconds and the drawer will thank you!

Step 5: Time to get creative, or not. There are tons of drawer organizers you can purchase to help keep your junk drawer under control. If you don't want to buy more stuff, you can see if you have anything around your house that will do the job. One freebie way would be to cut boxes of various dimensions down to size - short enough to allow the drawer to open and close. I ended up using a small box and its lid to organize our loose batteries, paper scraps, and random odds and ends.

Step 6: Step back and admire your work!

Here's an "after" photo of my junk drawer:


Today's task: de-clutter and get your junk drawer under control


Friday, January 8, 2010

Magazines

To go along with the snail mail clutter theme from yesterday, the task for today will be to organize those magazines we all have laying around. You know, the ones we plan on reading when we find the time yet are still sitting around months later? At our house, magazines tend to collect on the tables in our living room, just in case guests want to look at them. Now that I think about it, though, I sure hope we're good enough hosts that our guests aren't dying for a magazine to read!!! Goodbye junky-looking magazine piles!

1) The first step is to decide which magazines you really want to keep around. Recycle any and all that you really don't feel you need to keep around. If you have a hard time throwing away magazines, see if your friends, your library, or local doctor's office would like to have them. There, now doesn't that feel better? At this point, you may want to consider discontinuing any magazines you no longer care to read. This will save you money in addition to saving you from the unnecessary clutter.

2) The second step is to decide which magazines you want to keep as reference material and which ones you just want/need to read.

For those you want to read, ask yourself why they haven't been read. If you aren't truly committed to reading them, recycle them! Are they just not handy when you want to read them? Find a way to put them in a more handy location. I have a tote I keep next to my bed that neatly holds all of the magazines I want to read. For some, hanging a magazine rack in the bathroom works well too. Just be sure to recycle those magazines after you've read them so you're not just moving around the clutter!

For those magazines you would like to save as reference material, Consumer Reports and Handyman Magazine for example, I suggest finding a location where they will actually be used as reference so they don't just become more clutter. We have magazines filed in our basement and in our garage depending on the magazine.

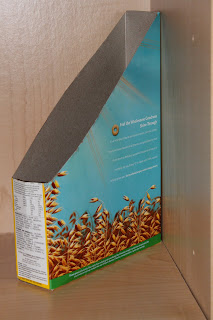
Once you've chosen your location, you'll need to find a way to keep them organized. There are many magazine racks and holders of all different types, materials, and colors available on the market today. I prefer ones that keep the magazines such that you can read the date on the magazine's spine. I also like to be able to label the holder so I can find what I need at a quick glance. Find a magazine holder that works for your space and style. We like using just the basic holders. You may prefer something completely different. If you prefer a free option, you can always use a cereal box cut to the same shape:

You can also paint or cover it to make it more fun!

From here on out, as soon as you receive a new magazine, your task is to either recycle it, place it in your "to be read" location, or file it away. It will take some time to get into the habit, but you can do it! Bye bye magazine clutter!


Wednesday, January 6, 2010

Movies

As I was looking around our house getting psyched up to get organized, I'll be honest... I got pretty darn overwhelmed. There's so much to do and seemingly so little time each day in which to do it all.

I thought about starting with our "junk" drawer. Do you have a junk drawer - you know, the one that is the catch-all for all of your odds and ends? We have one. Honestly, when we first moved into this house, my first question to my husband as we started unpacking the kitchen was, "Honey, which drawer is going to be our junk drawer?". I know, pitiful, huh? I got all charged up ready to dive in, until I opened the drawer. It was closed almost as quickly as it was opened. I figured I'd better start will something a bit more manageable.

Our first project of the new year is to get those DVDs, Blu-Ray disks, and VHS cassettes (if you still have some like we do) organized. Do yours look anything like this...

or this...?


This is actually pretty straightened up from what they sometimes look like. To start getting our videos under control, we decided to find a bin to put them all in. We took measurements of how large the shelves were for our DVDs/VHS cassettes so we would know how large a bin we could use. Unfortunately, every bin we found was too big for the shelf space - usually too tall. One other issue was that we didn't want to waste all of the space in the back, because we knew we'd need that space.

Since we couldn't find any DVD/VHS organizing bins that suited our needs, it was time for us to start thinking outside the box. We ended up finding sweater bins that were both cute and the perfect size for our space. Check it out...

Since we have two shelves for our DVDs and VHS cassettes, we decided to purchase two bins - one for our kids' videos, and one for all of my husband's action movies and my chick flicks.

The great thing is now we can quickly see all of the video titles. Also, we're utilizing the space all the way in the back.

Now it's your turn... you can do it!


Monday, January 4, 2010

Thinking outside the box

I encourage you to think outside the box when it comes to organizing. I absolutely love stores that sell stuff to help you organize. I could spend a ton of money there on all of the cute little bins and other storage items. I don't know about you, but as much as I love all of that cool stuff, though, we don't have an endless supply of money to spend on all of those fabulous items. Because we're on a budget, I sometimes have to think outside the box.

There's nothing to say you can't use boxes and bins you already have laying around the house just because that wasn't their intended purpose. We have all types of boxes and bins around our house being used for things other than they were initially meant for. It's okay of they're not the most beautiful boxes or bins. They can be covered or decorated with fabrics, wrapping paper, or other items you may already have around the house. The trick is not saving every box or bag you receive, though, because that can lead to a whole other problem which we'll start conquering later - clutter.

As we begin on this organizing journey together, I encourage you to start thinking outside the box.